Shrink a photo under 200 KB for an online application
A phone photo is several megabytes and the upload box takes 200 KB. How to get under the limit and keep the photo sharp, without uploading it anywhere.
By the operator of Dotori Tools5 min read
Open Batch Image Resizer & WatermarkA photo from your phone is usually a few megabytes. The photo box on an online application, a visa form or an exam registration page often has a size limit such as “200 KB maximum”, and anything bigger is refused. You do not need to install anything. It takes about five minutes in the browser.
The example below uses a deliberately huge original, a 30 MB public-domain photo. Phone photos are much smaller, but the steps are the same.
What you need
- One photo file (JPG, PNG or WebP).
- The Batch Image Resizer & Watermark open in a browser on your computer or phone. The photo is not uploaded. It is processed on your own device.
- The form’s instructions. Check the size limit, the file type and any pixel size before you start.
1. Add the photo
Drag the photo onto the box that says “Drop images or a folder here, paste (Ctrl+V), or click to choose”. On a phone, the box says “Tap to choose photos”. Tap it and pick the photo.
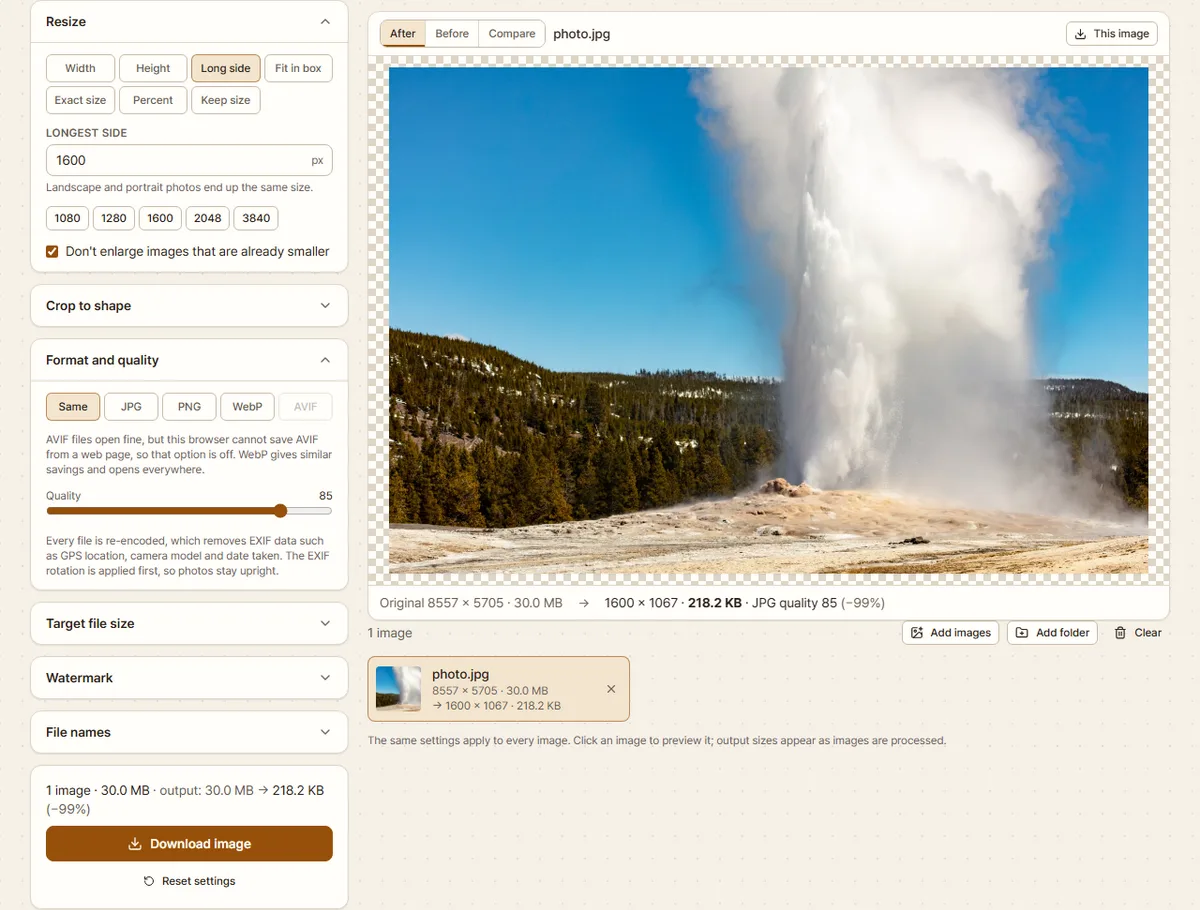
The tool shows a result straight away, using the default settings (what you see on a first visit). “Resize” is set to “Long side” at 1600 px, and “Format and quality” is set to “Same” with quality 85. My example went from 8557 × 5705 · 30.0 MB to 1600 × 1067 · 218.2 KB. That is a big drop, but still over 200 KB.
2. Set the target file size
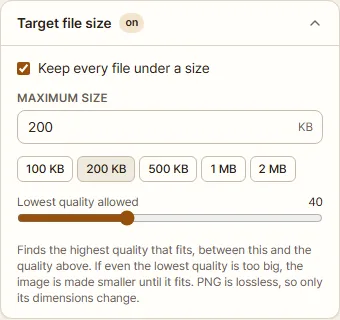
In the settings (the left column on a computer), click “Target file size” to open it. Tick “Keep every file under a size”. A small “on” appears next to the group name.
Look at the “Maximum size” box. If it already says 200, leave it. If not, click the “200 KB” button below it. If your form uses a different limit, type that number into the box. I left “Lowest quality allowed” at its default of 40.
3. Check the result and download
The line under the preview changed as soon as I ticked the box:
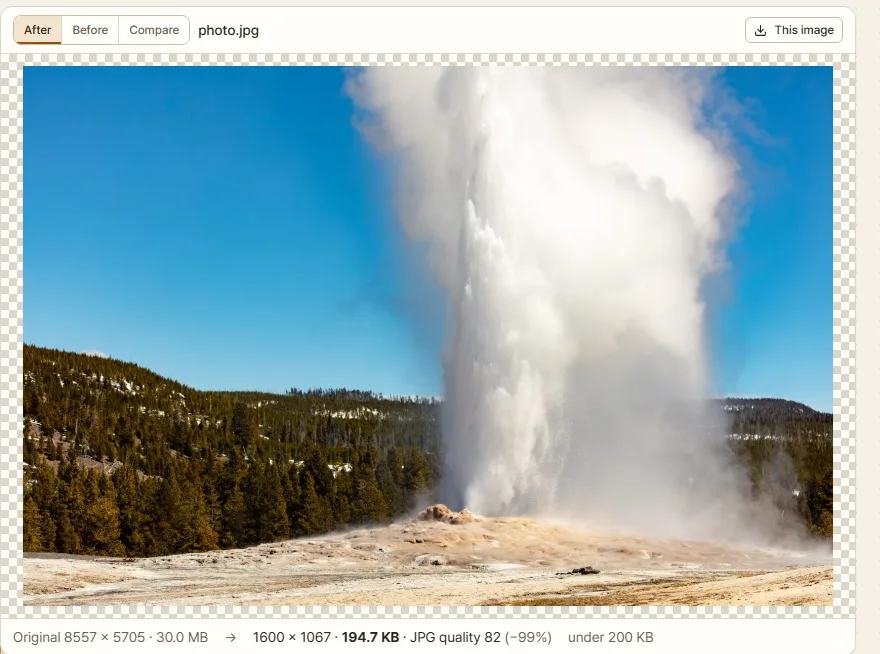
Original 8557 × 5705 · 30.0 MB → 1600 × 1067 · 194.7 KB · JPG quality 82 (−99%) under 200 KB
The size stayed at 1600 × 1067. Only the quality went down, from 85 to 82. When the line ends with “under 200 KB”, the file fits.
Click “Download image” under the settings to save it. On a phone, use the “Download” button in the bar at the bottom of the screen. The saved file kept its name, photo.jpg, and was 199,323 bytes.
Be careful about how your form counts. This tool counts 1 KB as 1,024 bytes. Some forms count 1 KB as 1,000 bytes. My file is under 200,000 bytes, so it passes either way. If your result is only just under the limit, give yourself room. Type 195 into “Maximum size” and download again. That file will be under 200,000 bytes by any count.
I opened the downloaded photo at full size. The sky had no blotches or bands, and the water drops around the steam and the snow between the trees were still clear.
When it does not work
The message says “Cannot reach 200 KB; this is the smallest version.” The tool has already tried the lowest quality you allow and shrunk the picture to 5% of its size, so making it smaller yourself will not help. Lower “Lowest quality allowed”, and if the photo is a PNG, switch to JPG (see the next item).
The photo is a PNG. PNG is lossless, so quality cannot be lowered. Only the dimensions change, and the photo may end up much smaller than you want. Under “Format and quality”, click “JPG” instead of “Same”. Many photo upload boxes take only JPG.
The form needs an exact pixel size. Under “Resize”, click “Width” and type the width from the instructions. The height follows the shape of the photo. If both width and height are fixed, click “Exact size”, type both numbers and choose “Crop to fill”.
An iPhone photo will not open. Some browsers cannot read HEIC. The tool says “This browser cannot decode HEIC/HEIF. Open it in Safari, or set the iPhone camera to Most Compatible (JPG).” Do one of those two things.
Your settings look different from this guide. The tool remembers your settings between visits. If a setting is not what this guide shows, click “Reset settings” at the bottom of the settings and start again.
Why the photo stays sharp
A JPG’s file size depends on two things: how many pixels it has, and how hard it is compressed. This tool changes compression first. It searches between the quality in “Format and quality” (85 here) and “Lowest quality allowed” (40) for the highest quality that fits. Only if even the lowest quality is too big does it make the picture smaller. In my example, quality 82 was enough, so the dimensions never changed. If it does scale the picture down, the result line ends with ”, scaled to NN% to fit”. If the form fixes a pixel size, resize to that first. Fewer pixels give a smaller file at the same quality.
Photo: “Old Faithful Geyser eruption opening day 2019”, U.S. National Park Service (Yellowstone National Park). It is a work of the US federal government, so it is in the public domain. Source: Wikimedia Commons.

Try it with your own file. Nothing is uploaded.
Open Batch Image Resizer & Watermark